
This article explains the benefits of vetting your brand and describes the vetting process. The primary benefit of vetting is the potential to increase your daily messaging limits, gain access to special use cases, and improve your quality of service where applicable.
Vetting is not mandatory and is generally only needed if you require high-volume messaging throughput.
There are two levels of vetting to consider:
During the 10DLC registration process, you may have opted to skip Brand Vetting to accelerate time to market. Skipping vetting introduces a key risk: as your messaging volume grows, you may exceed your permitted throughput and encounter carrier restrictions.
This article outlines your options:
- If you have not completed Brand Vetting but now need to: Learn how to initiate and complete the vetting process.
- If you have already completed Brand Vetting but need higher throughput: Understand the available paths to qualify for a higher carrier throughput tier.
Below, we walk through each scenario and the steps required to help you avoid blocking due to Brand quota limitations.
The vetting process is managed through The Campaign Registry (TCR) and can be initiated on your behalf by a Customer Service Provider (CSP) through external vetting partners. Depending on your business type and use case, you will be assigned a vetting score ranging from 1-100.
Learn How to Initiate & Complete the Brand Vetting Process via The Campaign Registry (For CSP Customers)
Steps for Vetting your Brand:
-
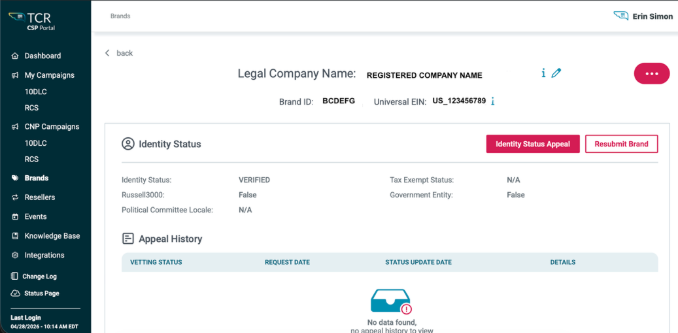
Access The Campaign Registry (TCR) or get your CSP to do this on your behalf: Log in to your TCR account. Ensure the brand you intend to vet is already registered.
-
Navigate to the "Brand Details" Page: Select the specific brand and proceed to its "Brand Details" page:
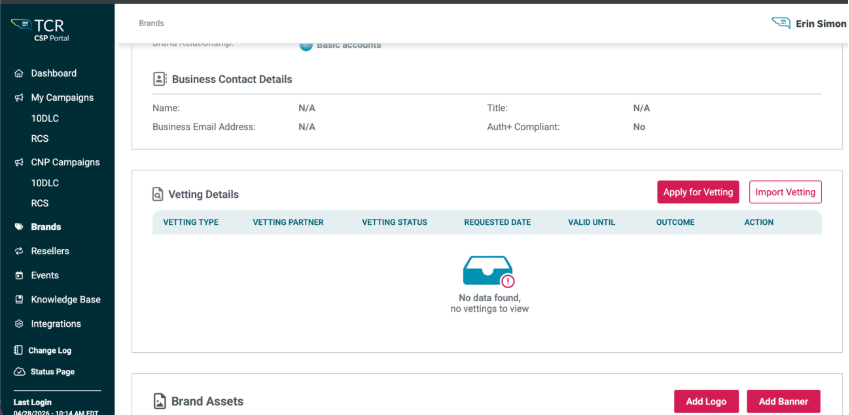
- Initiate Vetting: On this page, you scroll down and will find the Apply for Vetting option:
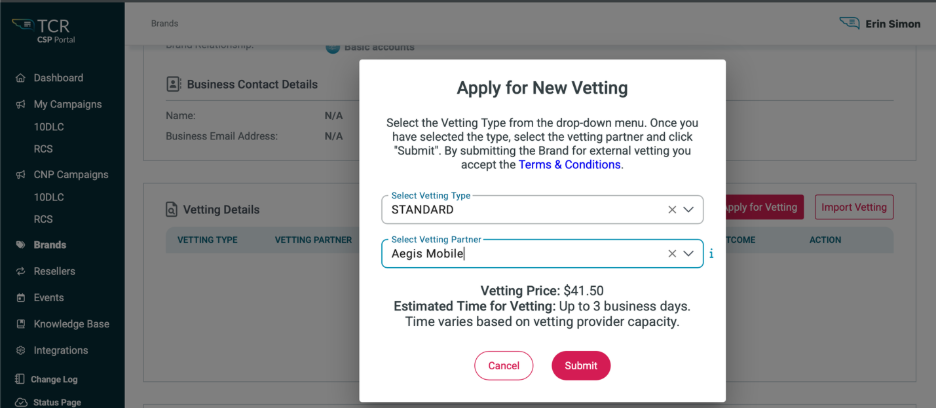
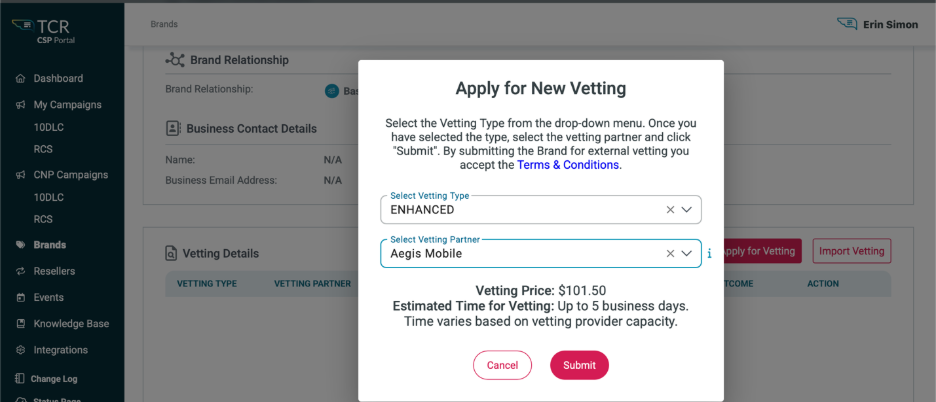
- Select Vetting Partner and Level: Choose an external vetting partner from the available options and decide between "Standard" (similar to a basic credit check) or "Enhanced" (a more detailed investigation) vetting:
Selecting "Standard": Costs $41.50 and typically takes up to 3 business days.
Selecting "Enhanced”: Costs $101.50 and takes up to 5 business days, however time may vary.
- Click Submit. Follow the prompts to submit your vetting request, providing any additional required brand information and/or documentation.
- Monitor Status: Track the progress of your vetting request within TCR. Once completed, your brand's vetting score will be displayed on the "Brand Details" page.
- One critical last step: After your Brand has been vetted and the Brand score has been established or updated, you must go back to any campaigns currently in production and associated with the Brand, and "resubmit" the campaign in order for the daily caps to get updated on T-Mobile. Daily limits do not automatically get updated. You must resubmit the campaign to get them updates. Resubmitting the campaign does not resubmit it to the DCA, or update any billing mechanisms.
Understand the Available Paths to Qualify for a Higher Carrier Throughput Tier -Brand Vetting Requests (For Sinch Direct Customers)
You can contact your Sinch Account Manager, or you can create a support ticket to request Brand Vetting. Technically, you don’t need to create a login to create a ticket. A login is recommended, though, so that you can manage your current tickets and/or track any past tickets.
Additional Remedies for Increasing Throughput
1) Optimizing Your Sending Practices
For better deliverability and to ensure compliance with daily messaging limits, we recommend adjusting your sending strategy from large, single-day "blasts" to a more distributed cadence.
Recommendation:
Instead of sending all your messages at once, pace your campaigns by spreading the total volume across multiple days. For example, if your daily cap is 10,000 messages and you need to send 16,000, schedule the campaign to send 8,000 messages on two consecutive days.
Key Insights & Benefits:
Avoids Exceeding Daily Caps: This is the most direct way to stay within your daily carrier-allotted message limit and prevent service disruptions.
Suggestion:
Utilize message scheduling tools to automate this process. By planning your campaigns to run over several days, you can maintain a steady sending rhythm, ensuring compliance and maximizing the successful delivery of your messages, while complying with brand daily sending allotments.
2) Upgrading Your Campaign for Higher Throughput
If you are currently using a "UCaaS LOW" campaign and find its 2,000-message daily limit restrictive, the most effective solution is to upgrade to a "UCaaS HIGH" campaign.
Recommendation:
To qualify for a UCaaS HIGH campaign, your brand must first undergo the vetting process. We recommend initiating this process as soon as you anticipate needing higher volume. This strategic upgrade will most likely move you beyond the 2,000-message cap.
Key Insights & Benefits:
Unlocks Higher Volume: The UCaaS HIGH campaign type is specifically designed for vetted brands requiring greater messaging capacity.
Improves Brand Reputation: Successfully completing the vetting process demonstrates your brand's legitimacy to carriers, which can lead to improved message deliverability and a better sender reputation.
Suggestion:
When initially registering your brand, don’t necessarily look for the lowest cost option. Review what your needs are and consider the future requirements. If you think you will need more than 2,000 messages towards T-Mobile, consider using the UCaaS HIGH use case, but remember, you would also need to perform brand vetting to get a brand score which will hopefully give you a higher tier towards T-Mobile.
Visit the Sinch 10DLC Product Page to learn more about Sinch 10DLC or if you need more help with 10DLC or have any questions, contact Sinch, who will be happy help!
Comments
0 comments
Please sign in to leave a comment.